Understanding Butterfly Valve Installation
Proper butterfly valve installation is crucial for ensuring optimal performance, preventing leaks, and extending the valve's service life. Butterfly valves are quarter-turn rotational motion valves that use a disc to regulate flow. Whether you are installing a wafer-style, lug-style, or flanged butterfly valve, following correct installation procedures is essential for reliable system operation.
This installation guide provides detailed instructions that apply to most industrial butterfly valve applications, including water treatment, HVAC systems, chemical processing, and oil and gas pipelines. Always consult the manufacturer's specific installation instructions for your particular valve model.
Pre-Installation Preparation
Before beginning the installation process, thorough preparation ensures a smooth and successful valve installation. Proper planning prevents costly errors and system downtime.
Tools and Equipment Required
| Tool/Equipment | Purpose |
|---|---|
| Torque wrench | Proper bolt tightening to specifications |
| Socket set | Bolt and nut installation |
| Flange gaskets | Leak prevention between flanges |
| Bolt studs and nuts | Securing valve to pipeline |
| Level and measuring tape | Alignment verification |
| Gasket sealant | Additional leak protection |
| Pipe flange spacers | Correct pipe spacing if needed |
Site Inspection Checklist
- Verify valve size matches pipeline specifications
- Inspect valve for shipping damage or defects
- Check flange faces for damage or corrosion
- Confirm pipeline is clean and free of debris
- Verify flow direction marking on valve body
- Check that pipeline supports are adequate
- Confirm actuator and control connections are compatible
- Review system pressure and temperature ratings
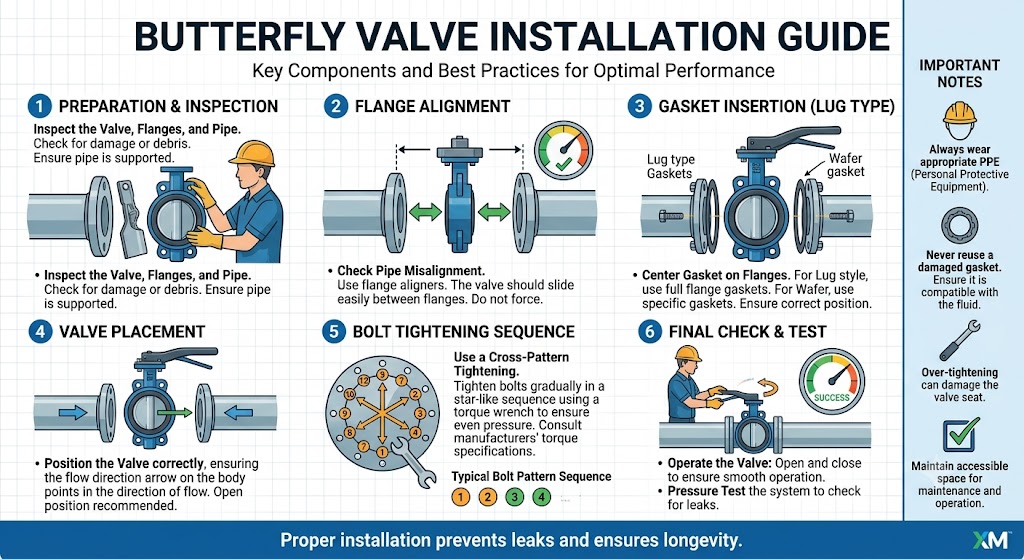
Step-by-Step Installation Process
- Prepare the Pipeline: Ensure the pipeline section where the valve will be installed is clean and free from welding slag, rust, scale, or other debris. Remove any burrs from pipe ends and ensure the pipeline is properly supported.
- Position the Valve: Place the butterfly valve in the pipeline, ensuring the flow direction arrow on the valve body points in the correct direction of flow. The valve disc should be in the fully closed position during installation to prevent damage.
- Install Flange Gaskets: Place new gaskets on each flange face. Never reuse old gaskets as they will not provide proper sealing. Apply gasket sealant to both sides of the gasket if specified by the manufacturer.
- Align the Valve: Carefully align the valve between the flanges, ensuring the bolt holes match up perfectly. The valve should be centered precisely to avoid mechanical stress on the valve body.
- Insert Bolts: Insert all bolts from the same side initially, then flip the assembly to insert remaining bolts. Hand-tighten all bolts to hold the valve in place.
- Tighten Bolts - Initial Pass: Using a star pattern, tighten all bolts to approximately 30% of the final torque specification. This ensures even distribution of pressure across the flange faces.
- Tighten Bolts - Final Pass: Following the same star pattern, tighten all bolts to the manufacturer's specified torque value. Use a calibrated torque wrench for accuracy.
- Verify Alignment: Check that the valve is properly aligned with the pipeline and that no excessive force is being applied to the valve body or connections.
- Connect Actuator: If installing a motorized or pneumatic actuator, connect the actuator according to the manufacturer's wiring and tubing diagrams. Verify all electrical and pneumatic connections are secure.
- Perform Leak Test: Gradually pressurize the system while monitoring all connections. Check for leaks around flange gaskets and actuator connections. Address any leaks immediately before proceeding.
Special Installation Considerations
Buried Service Installation
For underground applications, special considerations apply. Use valves specifically designed for buried service with appropriate corrosion protection. Ensure proper bedding material and backfilling techniques to prevent damage to the valve body. Provide adequate clearance for maintenance access.
Vertical Pipeline Installation
When installing butterfly valves in vertical pipelines, additional support may be required to prevent the valve from sagging. Use pipe supports or hangers positioned close to the valve body. For heavy actuators, ensure the actuator mounting is properly supported.
High-Temperature Applications
For hot media applications, consider thermal expansion effects on flange connections. Use spiral wound gaskets rated for the application temperature. Allow the system to reach operating temperature before final torque verification.
Chemical Processing Applications
When handling corrosive chemicals, ensure valve materials are compatible with the media. Verify gasket materials resist the chemical environment. Consider double-block-and-bleed configurations for hazardous service.
Actuator Installation
For butterfly valves equipped with actuators, proper actuator installation is critical for reliable operation.
Manual Gear Operator Installation
Gear operators should be mounted securely to the valve topworks. Verify the gear operator is in the correct position for the desired disc orientation. For rising stem valves, ensure the stem extension is properly sealed.
Pneumatic Actuator Installation
Mount the pneumatic actuator using the manufacturer's specified mounting kit. Connect air supply tubing and verify actuator rotation direction matches valve operation. Adjust travel stops to set proper open and closed positions.
Electric Actuator Installation
Install the electric actuator on a properly sized and rated actuator mounting bracket. Make electrical connections according to the wiring diagram, verifying voltage and phase requirements. Program limit switches and position feedback devices per manufacturer instructions.
Common Installation Mistakes to Avoid
Avoiding these common errors will ensure a successful butterfly valve installation:
1. Incorrect Disc Position During Installation
Never install a butterfly valve with the disc in the fully open position. This can cause the disc to contact the opposite flange face, resulting in damage or improper sealing. Always install with the disc fully closed.
2. Improper Bolt Tightening Sequence
Random bolt tightening creates uneven compression on the flange gasket, leading to leaks. Always use a star pattern and tighten in progressive stages to ensure even load distribution.
3. Using Worn or Damaged Gaskets
Reusing old gaskets almost always results in leaks. Always install new gaskets that are the correct material and size for the application.
4. Ignoring Flow Direction
Installing a butterfly valve backwards can affect shutoff performance and potentially damage the valve. Always verify the flow direction arrow before installation.
5. Inadequate Pipe Support
Pipe strain transmits stress to the valve body, causing premature failure. Ensure adequate pipe supports are installed on both sides of the valve.
Post-Installation Inspection and Testing
After completing the installation, perform thorough inspection and testing procedures:
Visual Inspection
Verify all bolts are properly tightened and safety wired where required. Check that there is adequate clearance around the valve for operation and maintenance access. Confirm valve identification tags are in place and legible.
Functional Testing
Cycle the valve through complete open and closed positions. Verify that the valve operates smoothly without binding or unusual noise. For actuated valves, check that all control signals function correctly.
Pressure Testing
Perform a hydrostatic or pneumatic test according to system requirements. Monitor all connections for leakage. Hold the test pressure for the specified duration before inspecting for any seepage or pressure drop.
Maintenance Schedule After Installation
Regular maintenance following installation ensures long-term reliable operation:
- Monthly: Visual inspection for signs of leakage, verify actuator operation
- Quarterly: Check bolt torque, inspect for corrosion, test emergency shutdown
- Annually: Full functional test, gasket inspection, stem lubrication
- Every 3-5 Years: Internal inspection when system allows, seat and seal replacement if worn
Summary
Proper butterfly valve installation requires careful planning, adherence to manufacturer specifications, and attention to detail throughout the process. Following this comprehensive installation guide will help ensure reliable valve performance and extended service life.
Key takeaways include preparing thoroughly before installation, using proper tools and torque specifications, following the correct bolt tightening sequence, and conducting thorough post-installation testing. When in doubt, consult with the valve manufacturer or a qualified instrumentation technician.
Regular inspection and maintenance after installation will help identify potential issues early and ensure continued reliable operation of your butterfly valve installation.
If you want to learn more about low-priced products, please visit the following website: www.xm-valveactuator.com