Irrigation solenoid valves are essential components in automatic sprinkler and irrigation systems. When a valve fails, it can cause water leaks, low pressure, flooding, dry landscapes, or uneven watering. This professional troubleshooting guide explains common irrigation solenoid valve problems, causes, diagnostic methods, and effective repair solutions for residential, commercial, and agricultural irrigation systems.
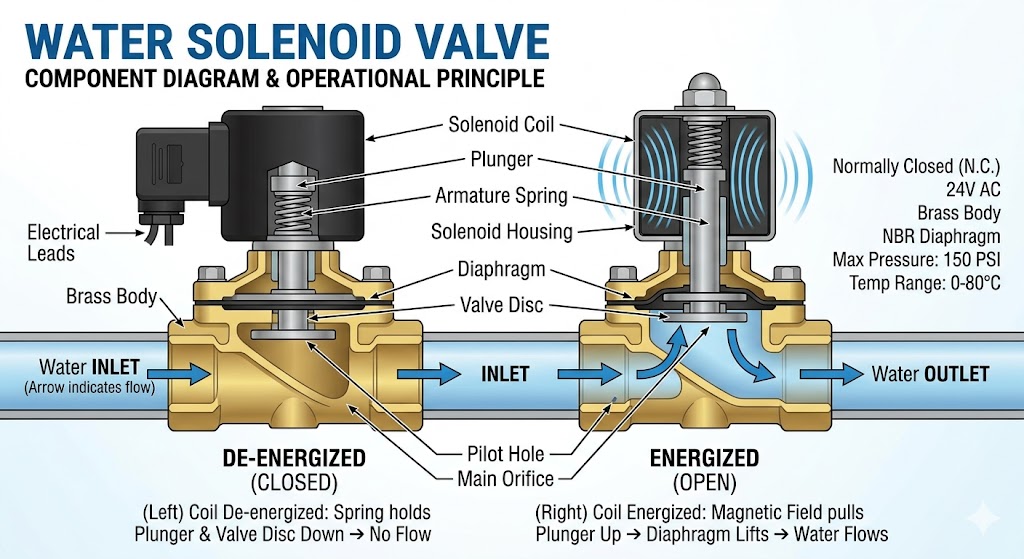
An irrigation solenoid valve uses an electromagnetic coil to control the flow of water through a valve body. When the irrigation controller sends electrical power to the solenoid, the magnetic field lifts the plunger and allows water to flow into the sprinkler zone. If any component fails, the irrigation system may stop functioning correctly.
How an Irrigation Solenoid Valve Works
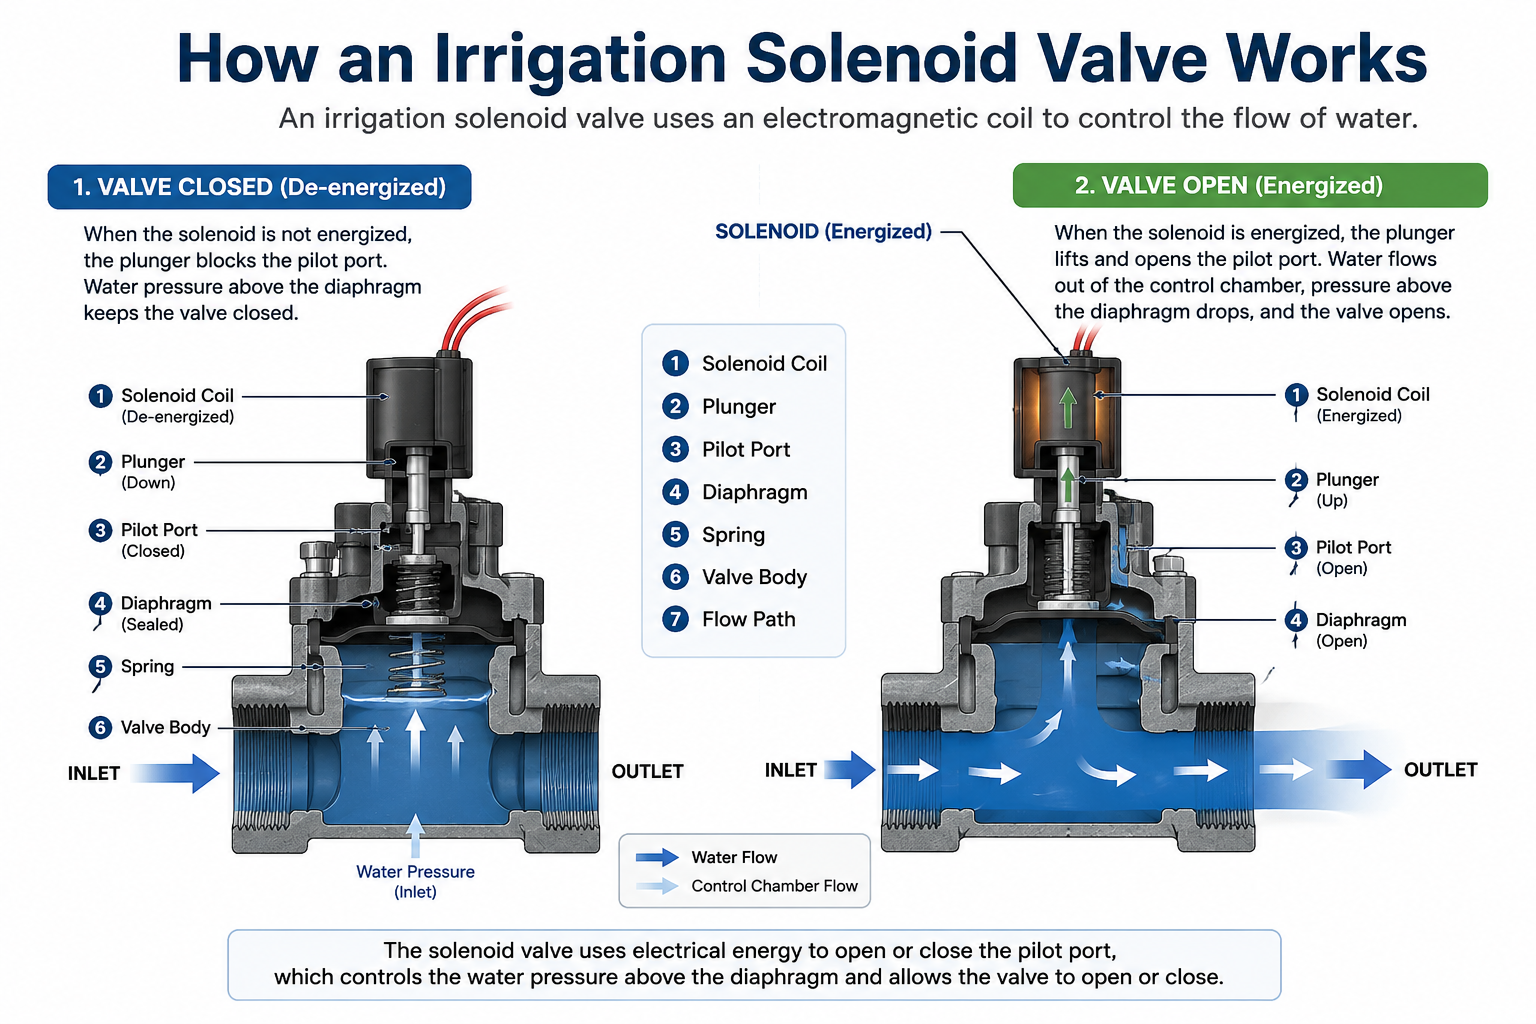
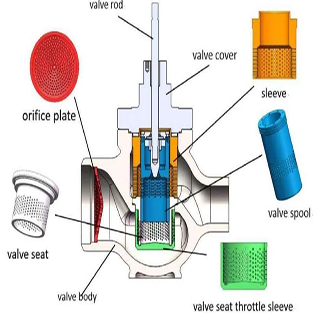
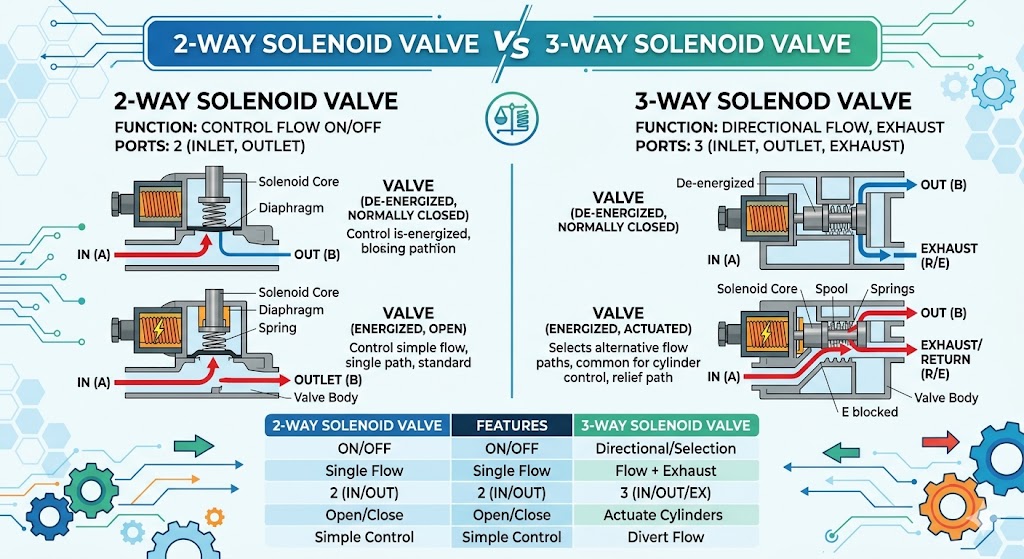
Understanding valve operation is important before troubleshooting. An irrigation solenoid valve normally consists of:
- Solenoid coil
- Plunger assembly
- Valve diaphragm
- Spring mechanism
- Manual bleed screw
- Inlet and outlet ports
When energized, the solenoid opens a pilot port, reducing pressure above the diaphragm and allowing water to pass through the valve.
Common Irrigation Solenoid Valve Problems
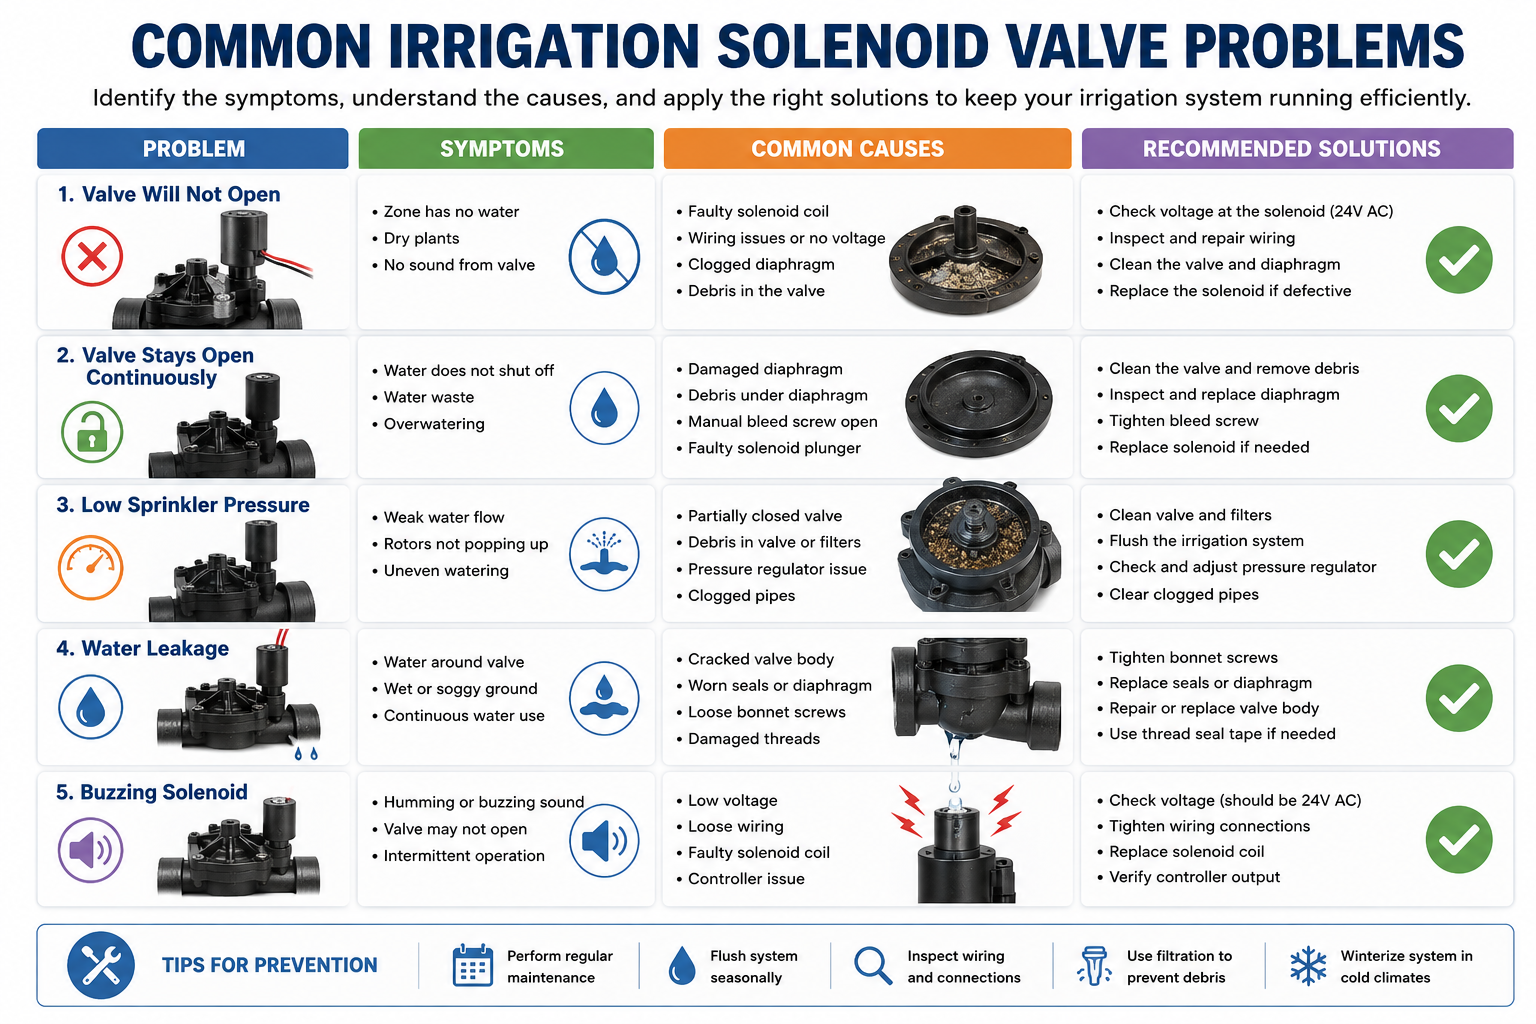
| Problem | Possible Cause | Recommended Solution |
|---|---|---|
| Valve will not open | Faulty solenoid, wiring issue, clogged diaphragm | Test voltage, replace solenoid, clean valve |
| Valve stays open continuously | Damaged diaphragm or debris | Disassemble and clean internal components |
| Low sprinkler pressure | Partially blocked valve or pipe | Flush irrigation system and inspect valve |
| Water leakage | Cracked valve body or worn seals | Replace seals or entire valve |
| Buzzing solenoid | Low voltage or damaged coil | Check controller output and replace coil |
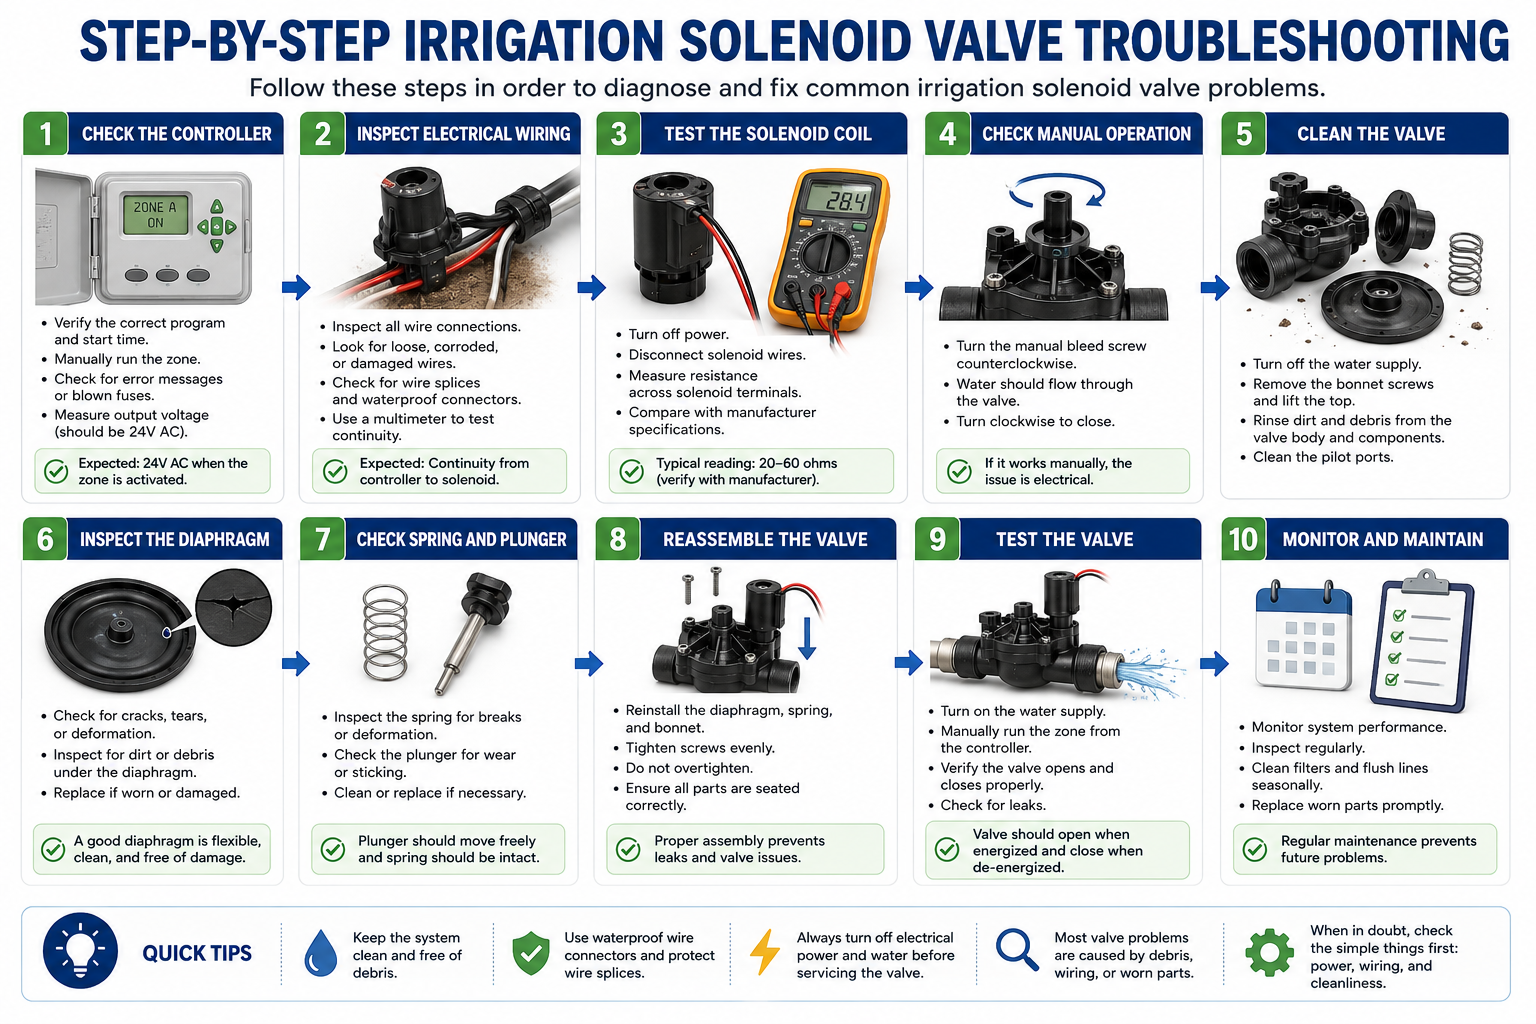
Step-by-Step Irrigation Solenoid Valve Troubleshooting
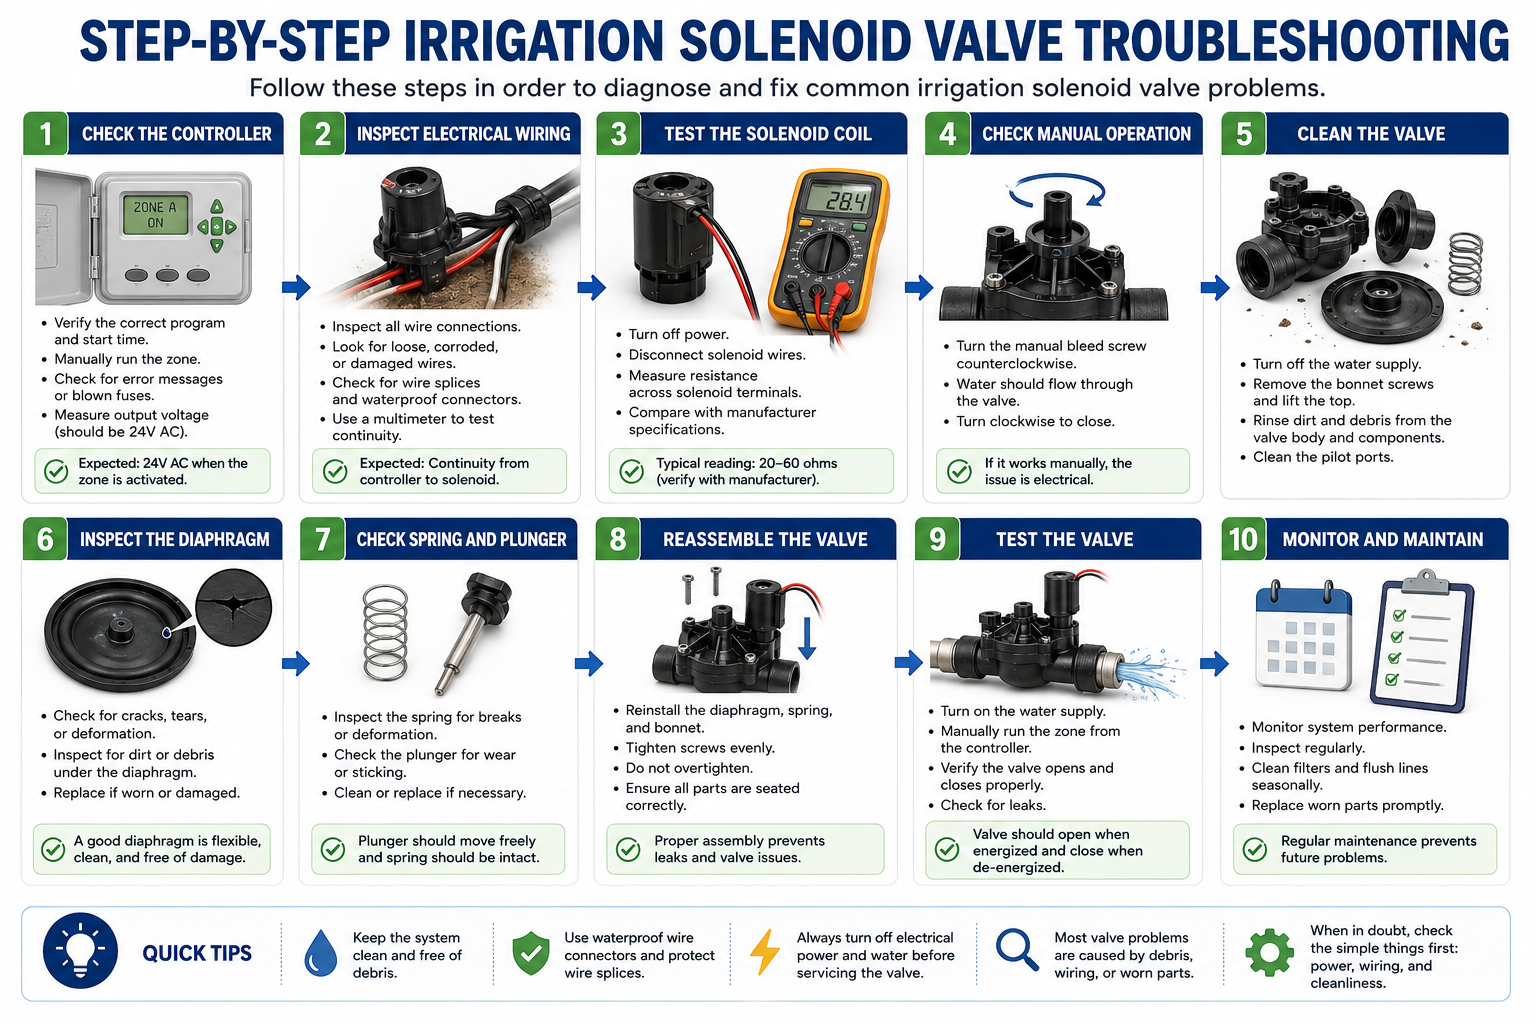
1. Check the Irrigation Controller
Start troubleshooting at the irrigation controller. Ensure the correct watering program is active and verify that the affected zone receives power.
- Check timer settings
- Inspect blown fuses
- Verify zone activation
- Measure controller output voltage
Most irrigation systems use 24V AC solenoids. Use a multimeter to confirm voltage at the controller terminals.
2. Inspect Electrical Wiring
Damaged or corroded wiring is a common reason for irrigation valve failure. Underground wire connections may deteriorate over time due to moisture exposure.
- Inspect wire splices
- Check for loose connectors
- Look for rodent damage
- Test continuity using a multimeter
3. Test the Solenoid Coil
The solenoid coil converts electrical energy into magnetic force. If the coil burns out, the valve will not operate.
To test the solenoid:
- Turn off electrical power
- Disconnect solenoid wires
- Measure resistance across terminals
- Compare readings with manufacturer specifications
Infinite resistance usually indicates an open coil, while extremely low resistance may indicate a short circuit.
4. Clean the Valve Internals
Dirt, sand, and debris can clog the diaphragm or pilot port, preventing proper operation.
Cleaning procedure:
- Shut off water supply
- Remove valve bonnet screws
- Inspect diaphragm for damage
- Flush debris from valve body
- Clean pilot holes carefully
- Reassemble valve correctly
5. Inspect the Diaphragm
A worn or torn diaphragm can cause leaking or prevent the valve from closing completely.
Replace the diaphragm if you observe:
- Cracks or tears
- Warping
- Hardened rubber
- Excessive wear
Why an Irrigation Valve Will Not Close
One of the most common irrigation issues is a valve that remains open after the watering cycle ends.
Typical causes include:
- Debris trapped under diaphragm
- Manual bleed screw left open
- Broken diaphragm spring
- Faulty solenoid plunger
- Continuous controller signal
Thorough cleaning often solves this issue without replacing the entire valve.
How to Replace an Irrigation Solenoid
Replacing a solenoid is usually fast and inexpensive.
- Turn off power and water supply
- Unscrew the old solenoid
- Install the new compatible solenoid
- Reconnect waterproof wire connectors
- Restore power and test operation
Always verify compatibility with the irrigation valve manufacturer before purchasing replacement parts.
Preventive Maintenance for Irrigation Solenoid Valves
Regular maintenance helps extend valve life and prevents costly irrigation failures.
| Maintenance Task | Recommended Frequency |
|---|---|
| Inspect wiring connections | Every 6 months |
| Flush irrigation lines | Seasonally |
| Clean valve diaphragm | Annually |
| Test solenoid resistance | Annually |
| Check for leaks | Monthly |
Signs You Need a New Irrigation Valve
Although many problems can be repaired, complete valve replacement may be necessary if:
- The valve body is cracked
- Internal threads are damaged
- Repeated diaphragm failures occur
- Severe corrosion is present
- The valve is outdated or unavailable for repair
Choosing the Right Irrigation Solenoid Valve
When selecting a replacement valve, consider:
- Flow rate requirements
- Pipe size compatibility
- Operating pressure range
- Voltage type
- Material durability
- Indoor or outdoor installation conditions
High-quality irrigation valves improve system efficiency, reduce water waste, and enhance landscape performance.
Frequently Asked Questions
Why is my sprinkler valve buzzing?
Buzzing usually indicates low voltage, loose wiring, or a failing solenoid coil.
Can a bad solenoid cause low water pressure?
Yes. A partially functioning solenoid may prevent the valve from fully opening, restricting water flow.
How long do irrigation solenoid valves last?
Most quality irrigation valves last 8 to 15 years depending on water quality and maintenance.
Should I repair or replace my irrigation valve?
Minor issues like debris or diaphragm wear can often be repaired, but cracked or heavily damaged valves should be replaced.
Conclusion
Proper irrigation solenoid valve troubleshooting helps maintain efficient watering systems, reduce water waste, and prevent landscape damage. By inspecting electrical connections, testing solenoids, cleaning valve internals, and replacing worn components, most irrigation valve issues can be resolved quickly and effectively.
Whether you manage residential sprinklers, commercial landscapes, or agricultural irrigation systems, understanding irrigation solenoid valve maintenance and repair is essential for reliable long-term performance.
If you want to learn more about low-priced products, please visit the following website: www.xm-valveactuator.com