When an irrigation system, pneumatic machine, or hydraulic unit stops working, the solenoid valve is often the prime suspect. But before you spend money on a replacement, you need to confirm the fault.
Learning how to test a solenoid valve is a fundamental skill for any technician or DIY enthusiast. A valve can fail in two ways: electrically (the coil burns out) or mechanically (dirt or debris jams the valve).
This guide will walk you through the three most effective methods to diagnose a bad solenoid valve, ranging from a quick "click test" to a precise multimeter inspection.
Safety First: Preparation
Before you begin testing, safety is paramount. Solenoid valves often control high-pressure fluids and operate on high voltages.
-
Turn off the power: Ensure the main power supply to the machine or system is disconnected.
-
Depressurize the system: Shut off the fluid supply and bleed any remaining pressure in the lines.
-
Visual Inspection: Look for obvious signs of damage, such as a melted coil casing, loose wires, or corrosion on the terminals.
Method 1: The "Click" Test (Quickest Method)
If you don't have tools handy, or just want a quick pass/fail check, you can use the magnetic properties of the valve.
-
Power the Valve: Briefly turn the power supply to the valve on.
-
Listen: A functioning solenoid valve should make a distinct "click" sound as the armature (plunger) moves upward to hit the core.
-
Feel: Place your fingertips lightly on the top of the coil casing. You should feel a mechanical snap.
-
The Screwdriver Trick: If the environment is too loud to hear a click, take a non-magnetized steel screwdriver. Energize the coil and touch the tip of the screwdriver to the metal part of the coil. If the coil is working electrically, you will feel a strong magnetic pull attracting the screwdriver.
Result: If there is no click and no magnetism, the electrical coil is likely dead. If there is a click but no fluid flows, the issue is likely mechanical (see Method 3).
Method 2: How to Test a Solenoid Valve with a Multimeter
This is the most accurate way to diagnose a failed solenoid coil. You will be testing the resistance (Ohms) of the coil winding to see if the circuit is intact.
Step 1: Disconnect the Coil
Remove the electrical connector (DIN plug) or disconnect the wires leading to the solenoid. You must test the valve in isolation, not while it is connected to the system's control board.
Step 2: Set Up the Multimeter
Turn your digital multimeter dial to the Ohms (Ω) setting. If your meter is not auto-ranging, set it to the 2kΩ range.
Step 3: Measure Resistance
Place the two probes of the multimeter across the two power terminals of the solenoid coil (usually pin 1 and pin 2). It does not matter which probe goes to which terminal (polarity doesn't matter for resistance).
Step 4: Interpret the Results
-
Normal Reading: A healthy coil will typically show a resistance reading between 20 ohms and 500 ohms, depending on the voltage and manufacturer. Always check the manufacturer's datasheet for the specific value.
-
Infinite / OL (Open Loop): If the screen shows "OL" or "1" (infinite resistance), the wire inside the coil is broken. The coil is burnt out and must be replaced.
-
Zero or Near Zero: If the reading is 0.0 to 0.5 ohms, the coil has an internal short circuit. This can damage your power supply if energized. Replace the coil immediately.
Method 3: Mechanical Inspection (If the Coil is Good)
If your multimeter confirms the coil is electrically sound (it has proper resistance), but the valve still won't open or close, the problem is mechanical.
-
Disassemble the Valve: Carefully remove the coil and unscrew the armature tube (stem) from the valve body.
-
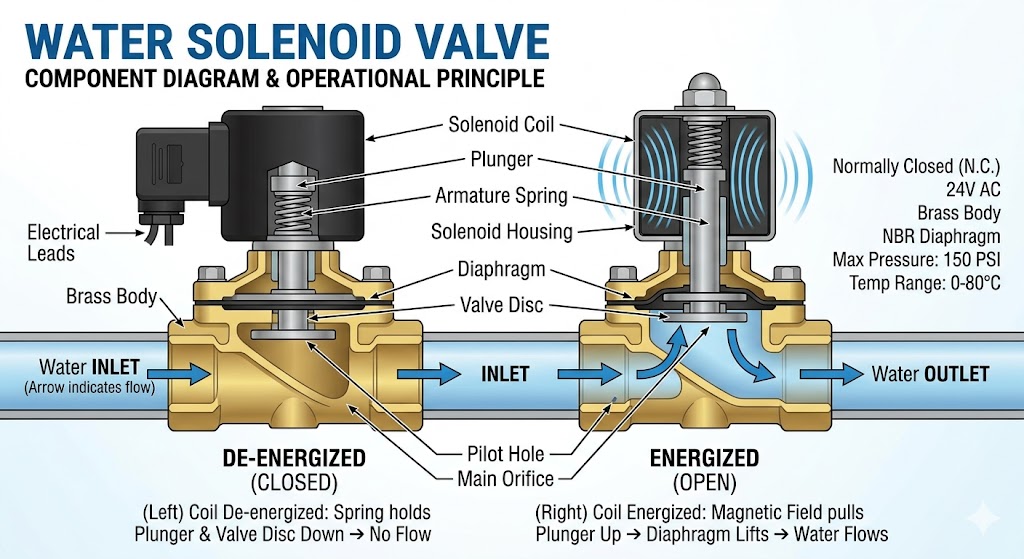
Check the Diaphragm: Look for tears, pinholes, or stiffness in the rubber diaphragm. A damaged diaphragm cannot hold pressure.
-
Inspect the Orifice: The pilot orifice is a tiny hole that controls the valve's operation. It is easily clogged by sand, rust, or lime scale. Clean it carefully with a needle or compressed air.
-
Check the Spring: Ensure the return spring inside the armature is not broken or compressed.
Common Symptoms of a Bad Solenoid Valve
To help you diagnose faster, here are common symptoms matched with their likely causes:
-
Valve won't open: Burnt coil (Open Circuit) or clogged pilot hole.
-
Valve won't close: Debris trapped in the valve seat or a broken return spring.
-
Loud buzzing noise: Low voltage supply or a dirty armature face (common in AC coils).
-
Leaking externally: Worn O-rings or cracked valve body.
Conclusion
Knowing how to test a solenoid valve can save you hours of downtime. Start with the magnetic "click" test for a quick assessment. If that fails, use a multimeter to check for an open or shorted coil. Finally, if the electronics pass the test, open the valve up to clean out debris.
If you want to learn more about low-priced products, please visit the following website: www.xm-valveactuator.com